Art Journal, Darkroom Door, Darkroom Door Stamps, Ecoline inks, Gelatos, Quotes

Inspiration for Darkroom Door Number Medley Stamp Set

Hello!

I’m just popping in with a pair of projects featuring the recent Darkroom Door rubber stamp release, this time I’ve been creating with Number Medley stamp set. I love the variety in this set, from printed sections to little snippets of hand-lettered numbers there are lots of options. This set will likely slot in nicely with many of the Darkroom Door sets you already own so I’ve decided to showcase it using two older stamp sets – Steampunk and Venetian Vol 2.

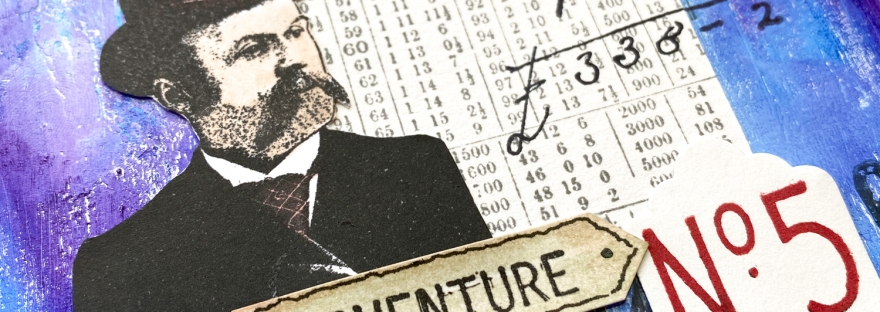
First up, let’s go adventuring! I created the background for this one by spreading my page randomly with texture paste and allowing it to dry. Then I applied a few colours of Faber-Castell Gelatos and smooshed them together to cover the background. The Gelatos spread easily and pick up the beautiful texture from the initial layer. 

Next, I stamped over parts of the page using elements from the Darkroom Door Numbers Medley stamp set using Ranger Archival black ink. I also stamped a number of the elements from the Darkroom Door Steampunk and Number Medley stamp sets onto smooth white card. 

I added a touch of colour to the adventure word, gentleman and balloon then fussy cut the stamped elements before adding to my page. Edging around the page with black Archival ink finished it off nicely.

I enjoy layering different elements to create a journal page and creating unique options using rubber stamps helps my vision for a page come together in a cohesive manner. Limiting options to a few colours and stamps helps the page to work together to tell your story.

For this page, I began by randomly painting my page with colours that played happily together such as pink, orange, blue and purple. I was careful to add the blue/purple sections after the orange parts had dried so I didn’t create mud! 

Next, I went in search of some plain patterned paper that would match the colour palette and found some sheets of lovely old Basic Grey. I stamped the sheets randomly with images from the Darkroom Door Number Medley stamp set, then cut them into scalloped sections to use as a border.

A bit of watery ink gave them a lovely grungy look. 

To complete the page, I stamped and coloured some images and the quote from the Darkroom Door Venetian Vol 2 stamp set. The scalloped borders and stamped images were then layered onto my page along with Tim Holtz Idea-ology pieces and some ornate trim. The page came together very quickly once all of the separate parts were prepared.

Supplies used:

I hope you have enjoyed this little snippet of inspiration. Make sure you pop over to Darkroom Door to see the rest of the January 2020 release!
Art Journal, Card making, Cards & Tags, Darkroom Door, Darkroom Door Stamps, Uncategorized

It’s Time to Dream Big

Hello!

I have another trio of projects to share with you from the new Darkroom Door release, this time I’ve been creating with Dream Big Sentiment stamp.

These long stamps are a great size for running top to bottom over a card front as I’ve used below, but they also give you a bunch of themed sentiments to use on a variety of projects. Just stamp out the whole image and snip out the individual sentiment you are after. Don’t forget to tuck the rest of the strip away for next time you need a quick word or two.

Purple Salt by Robyn Wood blog post – It’s Time to Dream Big – January 2020 new release projects using Darkroom Door stamps. 

Check out @robynwoodartist for more inspiration.

I think this card covers a few different occasions – the recipient can almost do a ‘choose your own message’ from it. The background was created by stamping Darkroom Door Spanish Tiles background stamp over a dictionary page painted with acrylic paint. I used Distress Oxide ink for a lovely opaque effect.

Purple Salt by Robyn Wood blog post – It’s Time to Dream Big – January 2020 new release projects using Darkroom Door stamps. 

Check out @robynwoodartist for more inspiration.

Can you tell I love creating different backgrounds? This was a simple one – a few squirts of Dylusions Shimmer Spray over watercolour card and then I overlaid a piece of bubble wrap and set the card aside to dry. The bubble wrap left the most wonderful abstract pattern behind.

I think the range of sentiments on this stamp will give you lots of options for greeting cards, scrapbooking and art journaling. I trimmed out a positive message for this shimmery card.

Purple Salt by Robyn Wood blog post – It’s Time to Dream Big – January 2020 new release projects using Darkroom Door stamps. 

Check out @robynwoodartist for more inspiration.

I like being able to separate the words of a sentiment or quote stamp and put them into a different arrangement for art journal pages. This means they can become a greater feature on the page, as I have done here.

This page was created over a background painted in pale shades of grey and apricot acrylic paint, I found a couple of interesting succulent images in a magazine and thought they would look good with the sentiment I wanted to use. The little birdie is Darkroom Door Robin Eclectic – he looks so cute on the page with the plants!

Supplies used:

I hope you have enjoyed this little snippet of inspiration. Make sure you pop over to Darkroom Door to see the rest of the January 2020 release!

Bella Paperie, Stencils

Mixed Media Art Journaling Workshop – Underwater Wonderland

A huge thank you to everyone who visited and commented on the Darkroom Door/Karen Burniston blog hop last week! I’m so glad you all liked my projects!

Now onto sharing about the mixed media art journaling workshop I will be teaching this weekend. Do you like splashing in colourful, delicious watercolour & shimmery spray inks? This might be the class for you;)

I’ll be sharing how to get more texture into your journals and reveal how to use inks and texture paste for interesting background effects. We will invite our inner child along to play as we create a school of quirky fish using watercolour techniques.

Bella Paperie is located at Shop 33, 302 South Pine Road, Brendale. Phone 3205 5911 to book. Class runs 10am – 2pm, August 5 and costs $30 with some supplies provided. You can find information on what to bring along to class here on the store blog.

Acrylic paint, Stencil Girl, Stencils, Tutorials

Stencil Girl – The Plain Box Society

Ages ago I saw a call on Facebook from Tina Walker for artists to join a unique type of challenge. We were to decorate a plain box, just 3″ square, however we pleased – the only requirement was to use stencils made by Stencil Girl.

Easy! Well so I thought, seems I need slightly more direction when doing a challenge;)

But in the end I’m so happy with how my box turned out, it is a little different to my usual project but still so me. Here is how it came together –

Many participants used a pre-made box but I decided to make my own from some heavy watercolour paper. Then I painted parts of the pieces with an analogous colour scheme, I always find these more soothing than jarring colours.

Next I mixed a little colour with some water and created random drippage along the sides.

Time to stencil! But which ones? How many to fully showcase my design? I settled for just two, one for the lid (Encouraging Scribbles) and another for the sides (Mix & Match Scalloped Edges). I left the border stencil intact to emphasise the lines of the shape.

The sides looked a little plain just stencilled but a bit of doodling with a fine black pen soon fixed that!


So pleased with how it came together. A huge thanks to Tina Walker for organising the challenge! You can read more about the challenge and see all the wonderful boxes created in Tina’s article for Stencil Girl. There is a fantastic variety and so much to inspire you.


SaveSave

SaveSave

SaveSave

Art Journal, Bella Paperie, Quotes

Join me for some creative play

Looking for something creative to do this week?

On Thursday, I’m running another Learn for Free session at Bella Paperie about using the Gel Press plates. Pop in any time between 10am – noon and get ready to soak up some knowledge, no need to book.

You are invited to bring your questions as you will have a chance to pick my brain about monoprinting! If you happen to miss it, I’ll also be demoing with the Gel Press at our Paper Craft Trail on May 5.


On Friday, I’ll be teaching an art journal class centred around the beauty of abstract flowers. After all,

The Earth laughs in flowers…

~ Ralph Waldo Emerson

it’s one of my favourite quotes and one that springs to mind whenever I see beautiful bunches of flowers or joyfully planted gardens. Why not put some happiness into your art journal with this abstract floral page?

This class will start with a textured page based on printed paper napkins and then we will build a beautiful bunch of flowers on top that will be wonderfully touchable. If you did a similar class with me previously, the techniques used for this one are quite different.

If you already art journal – bring along your usual kit, if not check the requirements list for a guide on what to bring. You will need an approx. A4 sized journal to begin with – please check in store for details. We would love to know where you are at with mixed media so let Deb know when you book in – absolute beginners are very welcome but the more experienced will find something to challenge them in each class.

We will be working in an A4 sized journal and please have on hand –

  • Paper napkins with all over types of designs. Abstract flowers and subtle pattern collages will work best and I will have some to share.
  • A variety of acrylic paints, particularly in flower colours plus some suitable for the background
  • A variety of paint brushes including a wide one suitable for matt medium
  • Black Stabilo or black watercolour pencil – Bella Paperie now has these in stock
  • Pencil
  • Scissors
  • White gesso
  • Liquitex Matt medium
  • Paint palette – one with separate wells will be very useful
  • Paint spatula
  • Non–stick craft mat
  • Spray bottle for water
  • Baby wipes
  • Paper towel
  • Container for water
  • Heat tool
  • I will provide the cheesecloth, book paper & tissue paper

Bella Paperie is located at Shop 33, 302 South Pine Road, Brendale. Phone 3205 5911 to book. Class runs 10am – 2pm, April 27 and costs $30 with some supplies provided.

SaveSave

SaveSave

Art Journal, Bella Paperie

Mixed Media Art Journaling – Cupcake Creations

Everybody loves cupcakes, especially when they come packed with flavour! Sadly, the cupcakes on this page won’t be edible but they will be a treat for the eyes.

Why not join me this Sunday in my monthly art journaling classes and create this sweet page with me? If you are a beginner, I’ll teach you the basics and if not then I’ll help you extend the skills you already have.

This month, our page will be full of the texture of ripped papers, stencilling and a surprise or two. Class will focus on creating texture through collage and I’ll share some alternative designs for those who wish to play with the technique further.


We will be working in an A4 sized journal and please have on hand –

  • Thin collage paper in ‘cupcake icing’ colours plus some neutral colours. Offcuts of scrapbook or cardmaking papers, book pages, old maps or your own mono printed papers will be perfect. I will have some on hand to share. If you have the time, prepare some of your scraps by ripping them into small pieces, no bigger than a 5c piece. You will need neutral colours for the patty paper & cake stand, yellowish papers for cake, two shades of pink papers for icing & a bit of red for a cherry. You will only need enough of each colour to cover the surface of each section.
  • 2-3 acrylic paints for background – I have used a pale yellow, green & blue
  • 2-3 stencils with open patterns for background
  • 1-2 stencils with small patterns for background
  • A variety of paint brushes
  • Black charcoal pencil. A Stabilo or black watercolour pencil is another option.
  • Pencil, rubber
  • Fine scissors for fussy cutting wording
  • White gesso
  • Liquitex Matt medium
  • Matt gel medium (only if you have it, I will have some to share)
  • Sponge for stencilling
  • Paint palette – one with separate wells will be very useful
  • Paint spatula
  • Non–stick craft mat
  • Spray bottle for water
  • Baby wipes
  • Paper towel
  • Container for water
  • Heat tool

N.B.  For this class we will be using DecoArt Media Fluid Acrylics for the main part of the project and we wil have some paints available for use in class. If you have your own fluid acrylics, please bring them along.

Bella Paperie is located at Shop 33, 302 South Pine Road, Brendale. Phone 3205 5911 to book. Class runs 10am – 2pm, February 4 and costs $30 with some supplies provided.

SaveSave

SaveSave

SaveSave

Art Journal

2018 – A Year of Slow

The start of a new year is always exciting for me; there are usually a bunch of new online classes about to start, I get invigorated anew for the photo a day challenges and that delicious quiet time between Christmas and New Year is a chance to recharge and reflect.


A mostly blank calendar seems to brim with possibility and adventure.


As in past years, I’ve chosen a word for the year – NOURISH served me well for 2017 and this year I hope SLOW will do the same in a slightly different way. So, 2018 will be a year of slowing down and taking notice of the little things, those everyday moments that we often forget as they pass in a flash. A year of doing more of the things that matter to me like spending time on my art, my photography and with friends and less of the things that don’t.

As each year passes, time seems to telescope together and life rushes by. Living with a degenerative illness means that each day comes with reminders that time is precious and should be celebrated. After twelve years of knowingly living with multiple sclerosis & possibly almost thirty years of having it, I’ve decided it is time to listen to those reminders for a change!

If you are unfamiliar with the idea of choosing a word, check out Ali Edwards and her posts on ‘One Little Word’. You don’t need to, but I take the annual online class with Ali as I find it keeps me on track throughout the year and opens my world to different ways of thinking about the passage of time and how it might be recorded and cherished.

I’d love to hear about your word if you choose one! I’m looking forward to sharing with you how I use mine in the coming year.

SaveSave

SaveSave

SaveSave

SaveSaveSaveSave

SaveSave

SaveSave

SaveSave

SaveSave

SaveSave

Acrylic inks, Art Journal, Bella Paperie, Darkroom Door Stencils, Mixed media, Stencils

Mixed Media Art Journaling – Fantasy Flower Garden

Are you looking to start your year with some mixed media creative play? Why not join me for in my monthly art journaling classes and learn the basics, or extend the skills you already have? Themes and techniques change each month but the thing that remains constant is the fun we have!

What would your fantasy flower garden look like? Would it be filled with colour? Alive with bugs and beetles? Perhaps it will have a teensy shed in the corner for the resident fairies? Why not join me as we play with the new Royal Talens Amsterdam acrylic inks and doodling techniques to create a fantasy flower garden.

We will be working in an A4 sized journal and please have on hand –
Acrylic inks (not Dylusions ink sprays) – I have used blue, yellow, gold plus a variety of flower colours
Quotes or wording relating to flowers or gardens for journaling
Fine black pen for journaling
Black & white paint pens in various widths or fine paint brushes and paint
Pencil, rubber
Scissors
White gesso
Liquitex Matt medium
Permanent brown ink
Stamping ink in shades of green. Class inks will be available.
Sponge for stencilling, the Tim Holtz mini ink blending tool and a few sponges will be handy to have
Variety of stencils for pattern making, small patterns plus one with a large open pattern will be useful
A selection of paint brushes for mark making, a #6 round & narrow filbert will be useful
~ 1” wide, flat brush for matt medium
Small amount of thin collage paper
Paint palette – one with separate wells will be very useful
Non–stick craft mat
Spray bottle for water
Baby wipes
Paper towel
Container for water
Heat tool
N.B. For this class we will be creating with Royal Talens Amsterdam acrylic inks which are new to Bella Paperie. Please bring whatever acrylic inks you have and we can talk through the various differences between them. I will have a selection of inks available for use in class.

Bella Paperie is located at Shop 33, 302 South Pine Road, Brendale. Phone 3205 5911 to book. Class runs 10am – 2pm, January 7 and costs $30 with some supplies provided.

SaveSave

Card making, Stampendous Stamps

Stampendous August Blog Hop!

Edited: competition extended to August 31.

Each month I am creating a project with brand new Stampendous stamps to inspire you. You also have a chance to win them via the monthly blog hop competition run by The Stencil Specialists, the Australian wholesaler for Stampendous.

This month we are using the Autumn Points stamp, I love the dotty swirls that surround the image which makes the stamp perfect to use as a feature all on its own.

I’ve created two cards to inspire you –


For this one, I created a drippy background using Distress Oxide inks and stamped it with the Autumn Points image. The short end was torn to give a bit of texture and all of the edges were sponged with Walnut Stain Distress ink.

I spritzed a second piece of cardstock with Lindy’s Stamp Gang sprays, then stamped just the leaves & seedpod a second time.


Once trimmed, I gave them a bit of shape and glued just the centre of the leaves in place on my card. This allowed the tips to lift slightly. I love how the Lindy’s Stamp Gang sprays add a touch of beautiful Autumn colour and shimmer.


For my second card, I used a background made previously to stamp over. The background was made using shaving cream and dye inks and has a wonderful mottled texture. It’s quick to put a card like this together when you have a nice pile of backgrounds already made up.

Don’t forget to also pop over to the other blogs to check out what they have created for the hop!

Julie – The Stencil Specialists
Donna – Luv to Emboss
Tracy Moloney – Tracy’s Creative Adventures

Contest details
To enter please visit each blog post and comment on the August blog hop post. Each comment is one entry so comment on each blog and you will have three entries into the contest. Make sure you only comment once per blog and let us know what state you are from. This competition is open to Australian residents only and the winner will be selected randomly by Julie after the end of the month. The prize will be cling Autumn Points CRR297.

Good luck!

PS You can subscribe to my blog to receive updates and sneaks for the next challenge.

Supplies Used

  • Stampendous Autumn Points cling stamp, CRR297 & Friendly Phrases SSC1141
  • Ranger Distress Oxide inks – Fossilized Amber, Wild Honey & Walnut Stain
  • Ranger Distress Ink – Walnut Stain
  • Lindy’s Stamp Gang spray – Autumn Maple Crimson & Cattail Copper Brown

SaveSave

SaveSave

SaveSave

SaveSave

SaveSave

SaveSave

SaveSave

SaveSave

SaveSave

SaveSave

SaveSaveSaveSave

SaveSave

Art Journal, Darkroom Door, Darkroom Door Stamps, Darkroom Door Stencils, Mixed media

Darkroom Door Stencil Blog Hop

Recently, Darkroom Door released a brand-new product – stencils! I was lucky to be given a few to play with and have been creating happily. The stencils come in two sizes – small (4½” x 6”) and large (9” x 12”) and are lovely and sturdy, so perfect for anything you want to throw at them.

Make sure you stay with me until the end of the post for some exciting giveaway news, but first I’d like to share some of the projects I’ve created recently.


The small stencils are perfect for cardmaking. I stencilled the small Darkroom Door Wildflowers using Dina Wakley black gesso over a sunset toned background created with Distress Oxides. The black images make a beautiful silhouette that can be accented with a brightly coloured butterfly and quote.


The Mesh Background and Texture stamps and ones I constantly reach for, so I was very excited to see these turned into stencils. The small one is so useful for adding instant texture to a background for a quick card or tag. It was easy to stencil into the background of the Darkroom Door Tulips Photo Stamp. A touch of pearlescent Gelatos to colour the flowers and I had unique, pretty card.


I’ve also used small Mesh stencil for this tag.


Who could resist letting this little birdie have his freedom? I’m kind of in love with creating backgrounds and liquid to go into mini jars using Distress Oxide inks – can you tell?


Although ‘small’ the smaller sized stencils are great for art journaling and the focal images make creating a page easy. I’ve simply stencilled the small Wildflowers using Dina Wakley black gesso across a drippy, messy background in my journal added a few words that kinda make sense and it was done.


The larger sized stencils very versatile as well. I stencilled over a messy collaged background with the large Mesh stencil and matt gel medium to give a wonderfully textured effect for this page. Then a bit of colour and a sprinkling of stamped images and the page was complete.


Have you played with Dina Wakley’s new Media Journal yet? I am loving the different textures of the pages and created this super quick page using Dylusions Ink Sprays and the large Darkroom Door Wildflowers stencil. The yummy watercolour paper soaks up the spray but quickly releases it when sprayed with water through the stencil.

Now it’s time for a giveaway!


Be sure to visit each blog and leave a comment. Five lucky winners will receive 3 stencils of their choice! Winners will be drawn from comments left across all the blogs, so be sure to leave a comment on each blog for more chances to win! Comments received before midnight Friday 4th August are eligible to be in the draw. Winners will be announced Monday 7th August on the Darkroom Door blog and Facebook page.

Hop along to the other blogs here:
Darkroom Door: http://www.darkroomdoor.com/Blog
Teresa Abajo: https://thetamarisk.blogspot.com
Belinda Spencer: http://happyscrapspace.blogspot.com
Autumn Clark: http://sewpaperpaint.blogspot.com
Godelieve Tijskens: http://stampingmathilda.blogspot.com
Anneke De Clerck: http://somefiddlingonthekitchentable.blogspot.com

Thanks so much for joining me today and reading to the end, make sure you visit everyone else to see what goodness the other girls have created. Good luck!

Darkroom Door stamps used –

  • Sets – Wings, Wildflowers Vol, Discover, Steampunk, Fine Flowers Vol 2, Full Bloom Vol 2
  • Eclectic – Compass Eclectic, Robin, Mini Mason Jar, Paris Postcard
  • Texture – Mesh
  • Word Block – Wellbeing, Journey, Wilderness
  • Collage – Butterfly Post


SaveSave

SaveSave

SaveSave

SaveSave

SaveSave

SaveSave

SaveSave

SaveSave

SaveSave

SaveSave

SaveSave

SaveSave