Card making, Cards & Tags, Darkroom Door, Darkroom Door Stamps, Distress Ink, Distress Oxide Ink, Ecoline inks

Vintage Label Inspiration from Darkroom Door

Hello!

Today I’d like to share with you a trio of cards I have created using the Darkroom Door Vintage Label Frame stamp. I have quite a collection of Frame Stamps from Darkroom Door and find they are designed to work beautifully with many other images in the collection. Each will accommodate a number of the Quote and Eclectic stamp images and they are great to layer with stamped images and ephemera as I have done for this trio of cards.

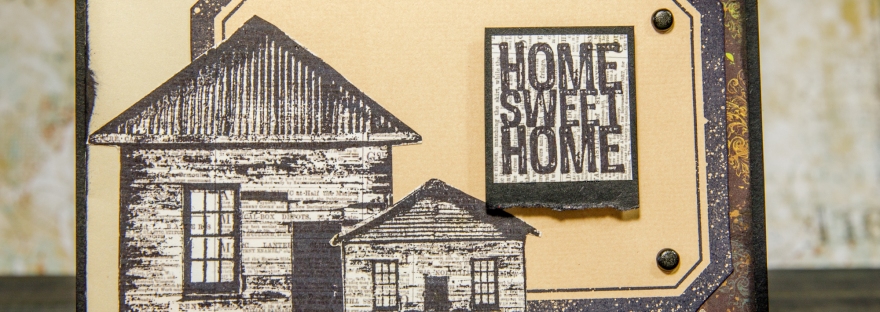
First off, I’d like to share this simple card featuring the Darkroom Door Vintage Label Frame stamp and images from the Home Sweet Home set. I stamped the quote and houses onto some neutral coloured patterned paper and fussy cut before layering over the Darkroom Door Vintage Label Frame stamp. A few brads, some extra patterned paper as layers and the card was complete.

I love to layer stamped elements over the edge of other pieces, and I’ve used that technique for this card. I had stamped the Darkroom Door Vintage Label Frame stamp over a background made using Distress & Distress Oxide Inks and tore one of the longer sides to give the card extra texture. The feathers come from Darkroom Door Feathers stamp set

and were stamped using Ranger Wendy Vecchi Make Art ink then fussy cut. A stamped and layered greeting from Darkroom Door Happy Birthday stamp set was a finishing touch.

There is something about butterflies mixed with shimmery backgrounds that brings out the happy. For this card, I stamped the Darkroom Door Vintage Label Frame image over a background created with Dylusions Shimmer Sprays. A trio of butterflies from Darkroom Door Fine Butterflies stamp set was stamped onto watercolour card using Ranger Archival black ink and coloured with Ecoline Markers. They layered beautifully with the frame stamp and a greeting from Darkroom Door Birthday Word Block stamp.

Supplies used:

I hope you have enjoyed this little snippet of inspiration for using the Darkroom Door Vintage Label Frame stamp. Make sure you pop over to Darkroom Door to see the rest of the January 2020 release!

Art Journal, Darkroom Door, Darkroom Door Stamps, Ecoline inks, Gelatos, Quotes

Inspiration for Darkroom Door Number Medley Stamp Set

Hello!

I’m just popping in with a pair of projects featuring the recent Darkroom Door rubber stamp release, this time I’ve been creating with Number Medley stamp set. I love the variety in this set, from printed sections to little snippets of hand-lettered numbers there are lots of options. This set will likely slot in nicely with many of the Darkroom Door sets you already own so I’ve decided to showcase it using two older stamp sets – Steampunk and Venetian Vol 2.

First up, let’s go adventuring! I created the background for this one by spreading my page randomly with texture paste and allowing it to dry. Then I applied a few colours of Faber-Castell Gelatos and smooshed them together to cover the background. The Gelatos spread easily and pick up the beautiful texture from the initial layer. 

Next, I stamped over parts of the page using elements from the Darkroom Door Numbers Medley stamp set using Ranger Archival black ink. I also stamped a number of the elements from the Darkroom Door Steampunk and Number Medley stamp sets onto smooth white card. 

I added a touch of colour to the adventure word, gentleman and balloon then fussy cut the stamped elements before adding to my page. Edging around the page with black Archival ink finished it off nicely.

I enjoy layering different elements to create a journal page and creating unique options using rubber stamps helps my vision for a page come together in a cohesive manner. Limiting options to a few colours and stamps helps the page to work together to tell your story.

For this page, I began by randomly painting my page with colours that played happily together such as pink, orange, blue and purple. I was careful to add the blue/purple sections after the orange parts had dried so I didn’t create mud! 

Next, I went in search of some plain patterned paper that would match the colour palette and found some sheets of lovely old Basic Grey. I stamped the sheets randomly with images from the Darkroom Door Number Medley stamp set, then cut them into scalloped sections to use as a border.

A bit of watery ink gave them a lovely grungy look. 

To complete the page, I stamped and coloured some images and the quote from the Darkroom Door Venetian Vol 2 stamp set. The scalloped borders and stamped images were then layered onto my page along with Tim Holtz Idea-ology pieces and some ornate trim. The page came together very quickly once all of the separate parts were prepared.

Supplies used:

I hope you have enjoyed this little snippet of inspiration. Make sure you pop over to Darkroom Door to see the rest of the January 2020 release!

Art Journal, Card making, Cards & Tags, Darkroom Door, Darkroom Door Stamps, Distress Ink, Distress Oxide Ink, Quotes

Let’s get dotty …

Hello! 

I have another set of projects to share from the recent Darkroom Door rubber stamp release, this time I’ve been creating with Abstract 07 Stamp. I really like the format of these stamps as it allows you to use them as a long strip to cover the edge of a journal page or across a card front but you can also bend it up to use just parts of the image as you hand stamp with it. I’ve used it both ways to create a set of projects to share with you.

First up is a cute card where I’ve curled the Darkroom Door Abstract 07 Stamp up a bit and stamped all over a cardstock panel in different coloured inks. Then, I took one of the colours and sponged the background to help incorporate all the different hues. I thought the chaotic collection of dots needed a bit of extra, so I added a sprinkling of tiny buttons. The card was finished off with some layering, a ribbon and a sentiment from Darkroom Door Warm Wishes stamp set.

For the next pair of cards, I stamped Darkroom Door Abstract 07 Stamp across a card panel using two different coloured inks. 

I love the variety of Eclectic stamps created by Darkroom Door, they give so much scope for using them in different ways. For this card, I stamped the Darkroom Door Crayons Eclectic image a couple of times and cut the crayons apart to make colouring easier. Each was coloured separately and attached over the cardfront to create a fun, happy card. 

Swapping around the ink colours and using a flower image from Darkroom Door Fine Flowers Vol 2 stamp set gave this card a very different look.

A quote from Darkroom Door Botanical Script stamp set finishes the pair off nicely. 

A simple mix of complementary colours always brings a pop to a handmade card and I’ve used that technique to create the colour scheme for this card.

I often make a bunch of backgrounds ahead of time and used a Distress Ink one for the blue panel in this card. The dotty panel was created by stamping with a variety of blue inks using the Darkroom Door Abstract 07 stamp. I had curled it up with my hands so that only a small portion of the image was in contact with the card. A layered flower image from Darkroom Door Bright Blossoms 2 stamp set and sentiment from the Darkroom Door Word Block stamp completes the card.

I’ve discovered that I love to create simple, minimal pages sometimes in my art journals. I’ve found it quite a meditative process, especially as I keep the colour palettes and techniques really simple.

For this final project using the Darkroom Door Abstract 07 stamp, I simply dripped runny paint across the top of a page in a Dylusions Dyalog Black Insert Journal and set it aside to dry. The colour needs to be quite opaque and pale for this to work. I stamped Darkroom Door Abstract 07 Stamp randomly over the top painted part of my page using an orange Distress Oxide ink. The Distress Oxide inks have a wonderful opacity that makes them visible over darker backgrounds.

A simple botanical shape sketched in white ink and quote from Darkroom Door Botanical Script stamp set finished the page. Nice and simple.

Supplies used:

  • Darkroom Door Abstract 07 Stamp
  • Darkroom Door Warm Wishes stamp set
  • Darkroom Door Bright Blossoms Vol 2 stamp set
  • Darkroom Door Fine Flowers Vol 2 stamp set
  • Darkroom Door Botanical Script stamp set
  • Darkroom Door Crayons Eclectic stamp
  • Darkroom Door Word Block stamp
  • Dylusions Dyalog Black Insert Journal
  • Ranger Distress & Distress Oxide Inks
  • Ranger Archival black ink

I hope you have enjoyed this little snippet of inspiration. Make sure you pop over to Darkroom Door to see the rest of the January 2020 release!

Art Journal, Card making, Cards & Tags, Darkroom Door, Darkroom Door Stamps, Uncategorized

It’s Time to Dream Big

Hello!

I have another trio of projects to share with you from the new Darkroom Door release, this time I’ve been creating with Dream Big Sentiment stamp.

These long stamps are a great size for running top to bottom over a card front as I’ve used below, but they also give you a bunch of themed sentiments to use on a variety of projects. Just stamp out the whole image and snip out the individual sentiment you are after. Don’t forget to tuck the rest of the strip away for next time you need a quick word or two.

Purple Salt by Robyn Wood blog post – It’s Time to Dream Big – January 2020 new release projects using Darkroom Door stamps. 

Check out @robynwoodartist for more inspiration.

I think this card covers a few different occasions – the recipient can almost do a ‘choose your own message’ from it. The background was created by stamping Darkroom Door Spanish Tiles background stamp over a dictionary page painted with acrylic paint. I used Distress Oxide ink for a lovely opaque effect.

Purple Salt by Robyn Wood blog post – It’s Time to Dream Big – January 2020 new release projects using Darkroom Door stamps. 

Check out @robynwoodartist for more inspiration.

Can you tell I love creating different backgrounds? This was a simple one – a few squirts of Dylusions Shimmer Spray over watercolour card and then I overlaid a piece of bubble wrap and set the card aside to dry. The bubble wrap left the most wonderful abstract pattern behind.

I think the range of sentiments on this stamp will give you lots of options for greeting cards, scrapbooking and art journaling. I trimmed out a positive message for this shimmery card.

Purple Salt by Robyn Wood blog post – It’s Time to Dream Big – January 2020 new release projects using Darkroom Door stamps. 

Check out @robynwoodartist for more inspiration.

I like being able to separate the words of a sentiment or quote stamp and put them into a different arrangement for art journal pages. This means they can become a greater feature on the page, as I have done here.

This page was created over a background painted in pale shades of grey and apricot acrylic paint, I found a couple of interesting succulent images in a magazine and thought they would look good with the sentiment I wanted to use. The little birdie is Darkroom Door Robin Eclectic – he looks so cute on the page with the plants!

Supplies used:

I hope you have enjoyed this little snippet of inspiration. Make sure you pop over to Darkroom Door to see the rest of the January 2020 release!

Acrylic paint, Art Journal, Darkroom Door, Darkroom Door Stamps, Monoprinting, Tutorials

Creating Abstract Patterns with Darkroom Door Abstract Stamps

Hello!

I’m back today sharing some projects featuring the new Darkroom Door Abstract stamp – Abstract 04. There are so many things you can do with these long, abstract style stamps. They can become a feature rather than just be used as part of a background and I’ve used them both ways for this post. I love the elongated, scratchy nature of this design and think it will be one I will use very often!

I love using these stamps with my Gel Press, they are perfect for removing paint from the plate and creating interesting textures. For this project, I have combined that effect with patterned paper and stamped images. The design can easily be scaled up to suit A5 or A4 size journals – just use larger Gel Press plates.

I started my art journal page by brayering over my spread with shades of pink. I left the coverage quite rough with masses of bare patches showing through.

I brayered the middle size Ranger Gel Press Plate with Dina Wakely Fuschia and removed some of paint over the whole plate using the Darkroom Door Abstract 04 stamp.

Next I ‘stamped’ the plate into my Dylusions Dyalog journal, trying to keep the outside borders about even. The idea was to create a spread with a frame in frame type effect. I repeated the process on the facing page.

I searched through some scrap patterned papers and came across some small pieces of Prima paper that suited my colour palette. I added a scrap of velvet ribbon and a torn edge to one then glued them both onto my page. 

The background needed a bit of the colour knocked back to give a good range of contrast so a few swipes of white gesso from the back of a spatula fixed the balance nicely.

A pair of blooms from Darkroom Door Beautiful Blooms stamp set were stamped onto white card with black permanent Archival ink then coloured with pencils and fussy cut. The flowers were then added to the page along with a layered quote from the same set to finish the page.

Next, I’d like to share one of my favourite ways of using clear embossing powder to give a shimmery look to an embossed image with Perfect Pearls mica powder. This technique will also work with any finely ground, coloured mica powder.

I stamped the Darkroom Door Abstract 04 stamp onto smooth black card using Versamark clear ink and embossed with clear embossing powder. The abstract nature of the stamp means that although you need to get a fair amount of the image stamped, it doesn’t need to be perfect. I did this all over three approx. A6 size pieces to allow one piece for each shimmer colour.

Once the embossing was done, I selected three colours of Ranger Perfect Pearls that would work together. Taking each colour in turn, I gently reheated the embossed piece and then dusted Perfect Pearls over the embossed area using a mop brush and set it aside to cool.

Once cool, I brushed over the cardstock and returned excess powder to my container (you don’t want to waste any!). I heated the embossing again and this allows the colour to ‘melt’ into the embossing, set aside to cool. As a final step I wiped over the surface with a tissue to reveal the shimmery embossing.

Circles of different sizes were punched from each piece to give me enough to cover my card front.

I stamped and embossed the Happy Birthday word Darkroom Door Brushed Sentiments stamp set then fussy cut around the words.

I layered the card front with circles, making sure they overlapped with the lines of the scratches running in every direction. I raised some with foam squares to give some dimension.

This is a simple card to make but looks like each piece has been foiled. Not so easy to photograph but it sure does shimmer in the light!

Supplies used:

  • Darkroom Door Abstract 04 stamp
  • Darkroom Door Brushed Sentiments stamp set
  • Darkroom Door Beautiful Blooms stamp set
  • Archival ink – Jet Black
  • Gel Press plate, brayer & acrylic paint
  • Versamark clear ink and clear embossing powder
  • Ranger Perfect Pearls mica powder 
  • Coloured pencils, circle punches

Thanks for joining me, make sure you check out the rest of the designs in the set on the Darkroom Door website. These stamps have already shipped to retailers so pop into your local store and pick one up – I’d love to see what you create so tag me on social media if you are sharing your project or leave me a link in the comments below.

Art by Marlene, Art Journal, The Crafters Workshop, Tutorials

Make the Impossible Possible

Are you a glass half full or half empty type of person? I’d like to think that I usually see them as half full – full of possibilities and endless opportunities. I’d like to share a new art journal page with you – this time it has been created in my mini Art by Marlene journal. I’ve also used Art by Marlene stamps and one of Marlene’s stencils from The Crafters Workshop. I love how all of Marlene’s products play so nicely together.

The format of this journal makes so many techniques possible – such as the one I’ve used for this page! The pages are easily removable and are made from a wonderful watercolour paper.

Follow along as I share how my page was created… the background technique gives a wonderful, subtle effect.

After choosing a stencil for the background pattern, I gave the page a layer of colour using watercolours. Keep the page quite wet with colour and quickly layer the totally clean stencil over before it dries. Allow the stencil and page to sit flat until fully dry.

Once removed, the stencil leaves a lovely, subtle pattern on the background.

You can get different effects by overlaying with plastic wrap or bubble wrap and changing up the colour palette to a darker, more saturated colour looks amazing.

I needed a little something to cover the areas at the top & bottom of the page where the stencil pattern didn’t quite reach – spotty circles fixed it nicely!

Marlene’s stamps often feature swirly patterns and doodles, they are so cute and I love using this bird stamp. Perfect for watercoloring so that is what I did;) Stamping the image onto watercolour yardstick with permanent black ink means the image was easily coloured without smudging.

In keeping with the colours on my page, I inked the edges a little with some permanent ink. Of course, a birdie needs a wire to sit on so a swish of black paint gave her somewhere to perch.

I felt the birdie needed a bit of sparkle – glitter gel pens to the rescue! What did we do before this glittery product?

I also added a bit of white detailing using a fine Posca pen to parts of the bird, including the whites of her eyes.

I love using quotes on my pages so selected one from Marlene’s sticker books and matted each of the words with a bit of cardstock I’d coloured with watercolour. Once trimmed, each word was also inked around the edges. Some foam squares gave them a little dimension and the page was done.

Supplies:

  • Art by Marlene A5 journal
  • Art by Marlene bird stamp
  • Art by Marlene sticker book
  • The Crafters Workshop Botanical Dream stencil
  • Black paint, watercolours, glitter gel pens, white Posca pen, permanent black ink

Thanks for visiting! I hope you have enjoyed learning how my page came together.

I thought it about time I made some more videos for YouTube. You will find one for this project on my channel shortly.

Art Journal, Bella Paperie, Stencils

Mixed Media Art Journaling – Abstract Textures & Found Poetry

Found poetry is one of the joys of serendipity – that magical result of leafing through some printed pages and just seeing what catches the eye. No planning, just following intuition to create something meaningful with words that fit together but perhaps not as they were originally intended.

The Beauty of the Unexpected - abstract, textured art journal page by Robyn Wood
The Beauty of the Unexpected

During January, I’ll be teaching a class on how to use abstract techniques of texture and colour and then combine them with found poetry to create a unique art journal page. Why don’t you join me?

The Beauty of the Unexpected

the joy of serendipity

The class will lead you through the combination of a bunch of techniques that can be used in a variety of other journal pages. We will have a colourful, splashy time!

Bella Paperie is located at Shop 33, 302 South Pine Road, Brendale. Phone 3205 5911 to book. Class runs 10am – 2pm, January 6 & 18 and costs $30 with some supplies provided. You can find information on what to bring along to class on the store blog at www.bellapaperie.net.au

Art Journal, Bella Paperie, Quotes

Mixed Media Art Journaling – Listen to Silence

What happens when you create some space in your life?

Space to think … to dream … to create?

Why not join me this Sunday as we try to tap into that space to create an art journal page that is calm and meditative. I will share some simple techniques to get your creative juices flowing and you will learn a few creative techniques along the way to harness the power of Dylusions spray inks.

Bella Paperie is located at Shop 33, 302 South Pine Road, Brendale. Phone 3205 5911 to book. Class runs 10am – 2pm, October 7 and costs $30 with some supplies provided. You can find information on what to bring along to class on the store blog at http://www.bellapaperie.net.au

Acrylic inks, Art Journal, Bella Paperie, Darkroom Door, Quotes

Mixed Media Art Journaling – Find Your Happy

Join me to create a wonderfully drippy, textured mixed media art journal page featuring a hand lettered quote. You are welcome to customise your page by bringing along your favourite quote to letter, or use the one supplied.

I will be sharing some tips for creating texture in your art journal using masks for beautifully touch-worthy pages. The page background is created using acrylic inks so I’ll be sure to show you my favourite techniques using these vibrant inks.

Bella Paperie is located at Shop 33, 302 South Pine Road, Brendale. Phone 3205 5911 to book. Class runs 10.30am – 2.30pm, September 28 and costs $30 with some supplies provided. You can find information on what to bring along to class on the store blog at http://www.bellapaperie.net.au

Art Journal, Bella Paperie, Monoprinting, Paper Artsy

Mixed Media Art Journaling Workshop – Fun with Sheeple

I love quirky images and the Sheeple stamps from Paper Arsty caught my eye recently so I decided to create a page around these fun, dancing characters. I’ll be teaching how to create it this Sunday at Bella Paperie and I’d love you to join me.

The class will start with a few basic techniques using the Gel Press to create a subtle background and then we will add some stamped imagery to enhance the page, finishing it off with a quirky Sheeple trio.

Bella Paperie is located at Shop 33, 302 South Pine Road, Brendale. Phone 3205 5911 to book. Class runs 10am – 2pm, September 9 and costs $30 with some supplies provided. You can find information on what to bring along to class here on the store blog.